


—
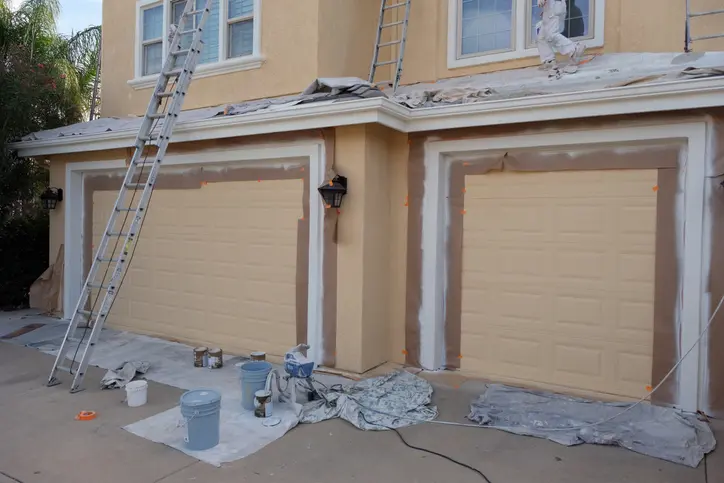
Exterior paint failures — peeling, bubbling, cracking — almost always trace back to inadequate preparation rather than poor paint quality. The prep phase before the first coat goes on is where professional painters spend a significant portion of their time, and for good reason: paint applied over a compromised surface will fail faster than paint applied over a properly prepared one, regardless of the brand or sheen level chosen. Understanding what prep actually involves helps homeowners evaluate bids accurately and know what to expect before the project begins.
Surface Inspection Comes Before Any Other Step
A thorough surface inspection identifies every condition that could interfere with paint adhesion before any cleaning or scraping begins. Painters look for areas of existing paint failure, water infiltration signs such as staining or soft wood, caulk that has cracked or pulled away from seams, rust bleeding from nails, and wood rot that has compromised siding or trim boards. In Bellevue, WA, where homes face sustained wet weather through the fall and winter, moisture-related damage is one of the most common findings during pre-paint inspections.
Conditions found during the inspection determine how much prep work the project requires. A home with stable, well-adhered existing paint in good condition needs less preparation than one with widespread peeling or areas of bare wood. The inspection findings also determine whether any wood repairs or caulk replacements need to happen before painting can proceed — both of which are done during the prep phase, not after.
Cleaning: Power Washing, Scrubbing, and Mildew Treatment
Cleaning the exterior surface removes dirt, chalk, mildew, and anything else that would prevent paint from bonding to the substrate. Power washing is the standard approach for most homes, using enough pressure to clean effectively without damaging siding or forcing water behind trim. The pressure and spray pattern are adjusted based on the siding material — fiber cement, wood lap, vinyl, and stucco each have different tolerances.
Mildew requires targeted treatment before or during the wash step. A mildew-killing solution is applied to affected areas, allowed to dwell, and then rinsed thoroughly. Painting over live mildew without treating it first allows the mildew to continue growing beneath the new paint film, which causes premature peeling. The house is allowed to dry completely after washing — typically one to three days depending on temperature and humidity — before any additional prep work begins.
Scraping, Sanding, and Surface Condition Prep
After the surface is clean and dry, any paint that has lost adhesion is removed. Hand scrapers and oscillating tools are used on loose edges and peeling areas. Sanding follows scraping to feather the edges between intact paint and bare areas, which prevents a visible ridge showing through the finished topcoat. On homes with heavy paint buildup from multiple prior paint jobs, sanding may cover a significant portion of the surface area.
Bare wood exposed through scraping is spot-primed before the full primer coat is applied — bare wood absorbs moisture differently than painted surfaces, and sealing it before priming prevents uneven absorption and improves adhesion throughout. The table below summarizes how the prep approach varies based on the condition of the existing surface.
| Surface Condition | Prep Required | Reason
|
| Clean, stable paint in good condition | Power wash, light scuff sand | Improves adhesion of new coat to existing film |
| Chalking paint (oxidized surface) | Wash with TSP solution, scuff sand | Chalk prevents adhesion if not removed |
| Peeling or flaking areas | Scrape, sand edges, spot prime bare wood | Loose paint must be removed before new coat |
| Mildew or algae growth | Biocide treatment, thorough rinse, dry fully | Live growth causes premature paint failure |
| Cracked or missing caulk at seams | Remove old caulk, apply paintable caulk, allow to cure | Open seams allow water infiltration behind paint |
| Bare wood (exposed substrate) | Spot prime before full primer coat | Unprimed wood absorbs paint unevenly and may bleed tannins |
Caulking and Wood Repairs
Exterior caulk seals the joints between siding and trim, around windows and doors, and at any location where two dissimilar materials meet. Old caulk that has cracked, pulled away, or hardened loses its ability to keep water out. Painters remove failed caulk with a utility knife or oscillating tool and apply fresh paintable caulk that is compatible with the topcoat being used. The caulk is tooled smooth and allowed to cure before paint is applied over it.
Wood rot identified during the inspection is addressed before painting begins. Minor rot can sometimes be stabilized with penetrating epoxy consolidants and filled with two-part epoxy filler, which accepts paint and resists moisture. More extensive rot requires replacing the affected board or trim section entirely. Painting over wood rot does not arrest it — the rot continues progressing beneath the paint film and the surface will fail again within a season or two. Addressing it during prep is far less disruptive than dealing with it after painting is complete.
Primer Application and Why It Matters
Primer performs several functions that topcoat paint cannot: it seals porous surfaces, improves adhesion over bare wood and previously painted surfaces, blocks stains and tannin bleed, and provides a uniform base that topcoat colors apply over evenly. Whether full-surface priming or spot priming is used depends on the condition of the existing paint and the type of substrate being painted.
Primer is not simply thinned paint. Exterior primers are formulated specifically for adhesion, flexibility, and moisture resistance — properties that are different from what topcoat paints are engineered to provide. Skipping primer on bare wood or on areas with adhesion concerns is one of the most common shortcuts that leads to premature paint failure. Professional painters account for primer in the project scope and schedule — it is not an optional step. Homeowners in Bellevue looking for exterior painting services that include thorough preparation can see how the full prep-through-finish process is approached by HELLO Painting, and review the exterior house painting services available for their area.
Frequently Asked Questions
How long does exterior paint prep typically take compared to the actual painting?
On a home in average condition, prep work often takes as long as or longer than the painting itself. A home with extensive peeling, caulking failures, or wood repairs may require two to three days of prep for every day of painting. Homeowners should expect prep to be a substantial part of the overall project timeline, not a quick preliminary step.
What temperature and weather conditions are required for exterior painting?
Most exterior paints require ambient temperatures above 50°F during application and for several hours afterward during the drying process. Rain in the forecast within 24 hours of a planned paint day typically causes the crew to reschedule. Direct sunlight on very hot surfaces can also cause paint to dry too quickly, which affects the quality of the finish. Painters plan their schedule around weather windows, which is why the timeline for exterior projects can shift.
Can painters work around obstacles like bushes and downspouts?
Yes. Painters typically move lightweight landscaping away from the house, tie back shrubs that cannot be moved, and remove downspout sections that are in the way of surfaces to be painted. Downspouts, light fixtures, and shutters that cannot be removed are masked off carefully before painting begins. Anything that cannot be adequately masked or moved is noted in the pre-project walkthrough.
Is it necessary to prime the entire house or just the bare spots?
It depends on the condition of the existing paint and the substrate. Spot priming is appropriate when the existing paint is in good condition and only isolated areas are bare. Full-surface priming is recommended when paint adhesion is compromised across large areas, when significant color changes are being made, or when the substrate is new wood. The contractor’s assessment during the inspection determines which approach applies.
—

