
—
Looking to have a website for your business but don’t have thousands of dollars to hire a web design expert? Don’t worry; I’m going to show you how you can DIY a professional-looking website for that business of yours.
You won’t even spend up to $50 (except if you want to), and it won’t take more than 30 minutes of your time.
Sidebar | Took my 80-year-old Grandma 35 minutes. I’m banking on you to do better.
So, let’s roll, shall we?
Building your website
To get started, you’re going to need a website builder. What the heck is a website builder? A curious reader might ask.
A website builder is a platform that provides you with all the tools (templates, themes, images, texts, menus, plug-ins, etc.) you need to make a site.
Generally speaking, there are hundreds of builders on the planet right now. I bet you’ve heard about some of them before. WordPress, Wix, Squarespace, Shopify, Magento, Weebly, GoDaddy, etc. – ring a bell?
As expected, each one of them has its terms and conditions – some are even free.
Sidebar | when has anything good ever come for free?
For this post, we’re going to go with WordPress.
Why WordPress? A smart reader would ask.
Because WordPress allows you to build your website on a self-hosted platform. In contrast, others offer to host your site for you.
Self-hosted means you have complete control over your site – how big or small you want it, what you can do with it, how you can improve its SEO, site update, amongst other things.
This level of freedom is why WordPress remains the ultimate choice for many wannabe website owners.
According to W3Techs – a World Wide Web Technology Survey company – WordPress powers about 40% of the websites on the internet.
So, why should yours be any different?
A step-by-step guide to building a pro-looking website in 30 minutes
Action 1) Choose a hosting provider
WordPress recommends BlueHost.
Go to the Bluehost.com website. Then click the green “Get Started Now” button.

Action 2) Choose Your Web Hosting Plan
These include Basic, Plus, Choice Plus, and Go Pro.
WordPress recommends Choice Plus.

Action 3: Set your domain name
The advantage of purchasing from Bluehost is that you get your domain name for free for the first year. To buy from Bluehost, simply type any desired name into the “create a new domain” box, and Bluehost will tell you whether the name is available or not.
If the name is not available, Bluehost will provide you with a list of similar names to choose from.

Action 4a) Register your Bluehost account
Next is to register your account with Bluehost.

Action 4b) Select your Bluehost hosting package
Here is where you choose the duration of your web hosting – 12, 24, 36, or 60 months.
Action 4c) Package extras
Next is a section showing the “package extras.”
Note that you don’t need most of the extras displayed in this section.

Action 4d) Make payment
Make payment and click the “Submit” button.

Bluehost will send you a confirmation email as soon as you complete the payment process. Along with this, Bluehost will also send you an email to verify your email address to activate your domain name.
Action 5) Set up your Bluehost account
- After receiving the verification email above, a page will be displayed to enter your domain name, and create a password for your account.
- Once done, click the “Create your account” button.

- Now click the “Go to login” button.
- Fill in the fields “Email or Domain Name” and “Password.”

You are all set. Now, you’re ready to start creating your site.
Action 6) Create your WordPress website
Once you’re in your Bluehost dashboard, you can create your website with just a single click.
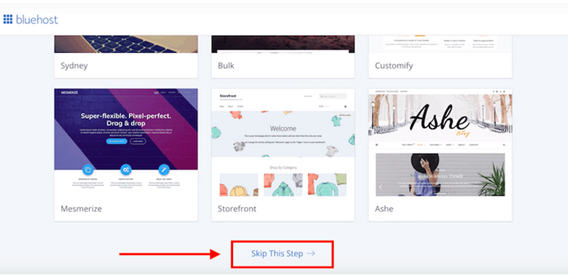
However, before proceeding, Bluehost offers you a host of theme ideas to customize your soon-to-be-live blog.
But if you want to choose themes later, you can skip this step by clicking on the “Skip This Step” button.
On the next page that comes up, WordPress asks you “what kind of site can we help you set up?” Business of Personal? Depending on the purpose of your site, you can choose either of the two.
Alternatively, you can just click “I don’t need help” to go right to your dashboard.

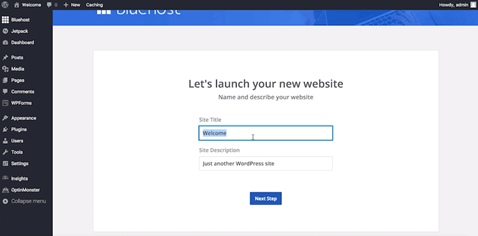
Finally, enter your “Site Title” and your “Site Description.”
From here, you are directed to a page to determine the layout of your website homepage.

Action 7) Customize your website
Now, let’s customize the site.
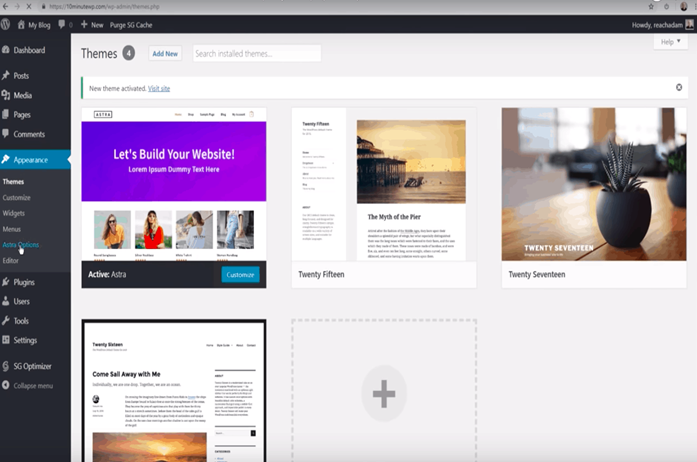
Go to your WordPress dashboard – which should be looking like the image below – and click on appearance.
Note: you can log in to your WordPress account via yourdomainname.com/wp-admin, using the credentials you entered while creating the account earlier.

Afterward, select “Themes” from the “Appearance” section. From the themes section, select “Add new.”

WordPress will display a ton of free themes for you to choose from.

We recommend you choose Astra.
Astra is among the most popular and fastest loading WordPress multipurpose themes.
So, go ahead and click on Astra.

Now, go to the sidebar menu, where you have “Astra options.” Click on it, and a new page should open.
This page is where you import your starter site.
So, go ahead and click on “Install Importer Plugin.”
Once that installation is complete, hit the “Download Library” button.

This should take you to a new page.
On this page, click on Elementor.
Note: Elementor is a page design builder that lets you choose from a variety of website designs.
As seen below, you can choose “Fresco”, “Modern Design Solutions,” “Steaks & BBQ,” etc., depending on which one best suits you.
For this guide, we chose Modern Design Solutions.

To install the design you choose design, click on the Install Plugin button.
Once the installation is complete, another button will pop up, which is Import This Site.
Click on it.

Edit Your WordPress Web Pages with Elementor
Now, hit the “Edit with Elementor” button to edit your web pages to taste.

Conclusion
So, there you have it – a live website for your business.
Did it take you up to 30 minutes?
Don’t think so!
—
This content is sponsored by Uday Tank.
Inset Photos provided by the author.
Featured Photo: Shutterstock
