
—
With the arrival of the new Windows 11 OS, the operational security and performance have gone up several notches. However, the basic problem of accidental and permanently deleted data remains the same. As a result, we tend to ignore the instant pop-ups and hastily press OK without even reading the message or warning displayed. A similar pop-up appears when you try to delete a file on your Windows PC. This pop-up is capable of saving you from the trouble of data loss.

Although you are here looking for the methods to recover data from computer, you are obviously way ahead of pop-up safety. Don’t worry, as there are several methods available to get back your permanently deleted data on Windows. This blog will enumerate the most viable ones for you.
1. Recover permanently deleted files using Backup on Windows
Your Windows OS comes with a utility called Backup & Restore. This tool is an inbuilt feature that creates copies of the recent data that can be used to get back your data in case of data loss. The only requirement is that you must have enabled the feature on your PC.
If you have enabled the backup feature, you can use the steps below to get your permanently deleted data.
Step 1: Connect the external storage media with the backup of your data to your Windows PC.
Step 2: In the search box, type Control Panel and open Control Panel from the search results.
Step 3: Click Backup and Restore (Windows 7) under the System & Security section.

Step 4: Click Select another backup to restore files from the option under the Restore section in the right pane.

Step 5: Select the most recent backup period in the new window and click Next.

Follow the instructions to get back your data.
2. Recover data using Previous Versions feature
Previous Versions is yet another native feature on your Windows PC that you can use to recover your permanently deleted files. Here is how you can use it.
Step 1: Locate the folder where your deleted file was saved. Right-click on the folder and choose to Restore Previous Versions.

Step 2: Choose the most recent folder version from the list under Folder versions.

Step 3: Click Restore or drag and drop the selected folder at a location of your choice.
Note: It is better to save the restored version on external storage as you might end up overwriting the existing files.
3. Use the command line to recover data
If you are comfortable using the Command Prompt, you can use it to recover data from computer. Command Prompt is particularly helpful if you have accidentally selected the hidden attribute for a file or folder. Follow the steps below to recover permanently deleted data.
Step 1: Type cmd in the Search bar and choose Run as administrator from the options under the Command Prompt app.

Step 2: In the Command Prompt window, insert the command chkdsk D: /f and press Enter.

Note: In the chkdsk D: /f command, replace the letter D with the letter of your hard drive.
Step 3: Once the process completes, insert the command ATTRIB -H -R -S /S /D D:*.* and again press Enter. Replace letter D with your hard drive’s letter.

The recovery procedure will start immediately. You need to wait till it’s complete.
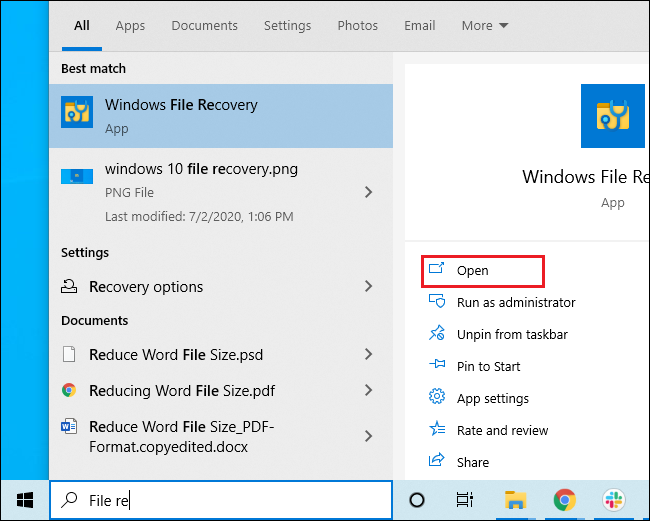
4. Recover permanently deleted data using Windows File Recovery
Windows file recovery is a command-line native tool of Windows. It is available only for Windows 10 version 20H1 or later versions of Windows OS. You can easily recover your permanently deleted data on Windows 11/10 computers by using the steps below.
Step 1: Launch the Windows File Recovery tool by typing it in the search box.
Note: If you haven’t installed it on your PC, download the Windows File Recovery tool from the official website and launch it.
Step 2: When prompted, click Yes to allow the tool to make changes.
Step 3: In the Command Prompt window, insert the command winfr source-drive: destination-drive: [/mode] [/switches]
Step 4: Choose from the following commands as per your lost data. The first two are the regular mode, while the third is the extensive mode option in the tool.
- To recover a folder from C drive to E drive, insert the following command and press
Winfr C: E: /regular /n \Users\<username>\Anatolia\
Note: Insert your user name between < > and replace Anatolia with your lost folder’s name.
- To recover PDF or Word files from C drive to E drive, insert the following command and press
Winfr C: E: /regular /n *.pdf /n *.docx
Note: Replace .pdf with the .docx if you need to recover a Word file.
- To recover jpeg and png files from the Pictures folder to the recovery folder on E: drive, insert the following command and press
Winfr C: E: /extensive /n \Users\<username>\Pictures\*.JPEG /n\Users\<username>\Pictures\*.PNG
Note: Use the following command for any other file extension and replace ‘invoice‘ with your file extension.
Winfr E: C: /extensive /n *invoice*
Step 5: Confirm the recovery action by typing Y and hitting Enter.
The recovery process might take some time, depending on the type and size of files. At any time, to cancel the operation, press Ctrl + C.
5. Securely recover permanently deleted data on Windows PC using software
If the above methods seem like a lot of work and you wish to save your time and effort, this method is the one that suits your need. If you want to perform any data recovery task on your Windows 11, 10, 8.1, or 7 PC, you can use the DIY Stellar Data Recovery Standard for Windows. The software easily recovers data lost due to almost any reason with 100% accuracy and in a secure manner. It doesn’t need any technical expertise, and its simplified UI allows you to recover data from computer in a few easy steps. Whether you lost your data due to accidental deletion or corruption, you can recover permanently deleted data with Stellar Data Recovery Standard.

To wrap it up
All the above methods are trusted and potent methods of data recovery on Windows PC. However, they might appear to vary in application complexity, which is why we have provided multiple methods to recover data on your computer. You may choose any of them as per your choice and applicability.
—
This content is brought to you by Jennifer David
Inset photos provided by the author.
Feature photo: iStockPhoto
